A slow right-click menu in Windows 11 can be frustrating, especially when the menu takes several seconds to appear or freezes before showing all available options. This can be caused by menu display delays, third-party context-menu extensions, or software that integrates with File Explorer.
How to make Windows 11 right-click menu faster? In this guide from Your System Fixer, we will provide 5 methods to solve the problem. Let’s start exploring.
TL;DR – Watch Quick Fix Video Guide
If you prefer a quick solution, check out our short video guide below. It shows how to reduce the menu display delay in Windows 11.
Why Is the Windows 11 Right Click Menu Taking So Long to Show All Items
While the Windows 11 context menu is intended to be cleaner, delays can occur if Windows loads additional menu items or third-party extensions. Here are common reasons why the Windows 11 right-click menu is so slow:
- Third-party context-menu extensions: Apps such as GPU utilities, compression tools, cloud storage clients, and other utilities can add their own options.
- Menu display delay: Windows uses the MenuShowDelay value to control how quickly menus appear.
- Problematic software: A recently installed or updated application may interfere with Explorer or add a slow-loading context-menu entry.
- Windows 11’s modern context menu: Some users simply find the new menu slower or less convenient than the classic Windows 10-style menu.
How to Fix Slow Right-Click Menu in Windows 11
There is no single fix that works for every Windows 11 PC because the cause can be different from one system to another. The methods below start with quick workarounds and simple settings changes, then move toward troubleshooting third-party extensions and restoring the classic context menu.
Method 1. Use Shift + Right-Click to Open the Classic Menu Quickly
The easiest workaround requires no system changes. Hold Shift and right-click a file, folder, or desktop item. Windows 11 will open the classic context menu directly, so you don’t have to click Show more options to access additional commands.
Method 2. Reduce the Menu Show Delay via the Registry Editor
Before modifying the Windows Registry, create a restore point or back up the relevant Registry key. Incorrect Registry changes can cause unexpected system behavior, so only modify the value specified below.
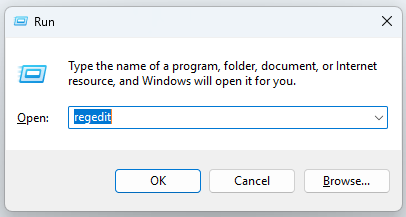
Step 1: Press Win + R, type regedit, and press Enter.
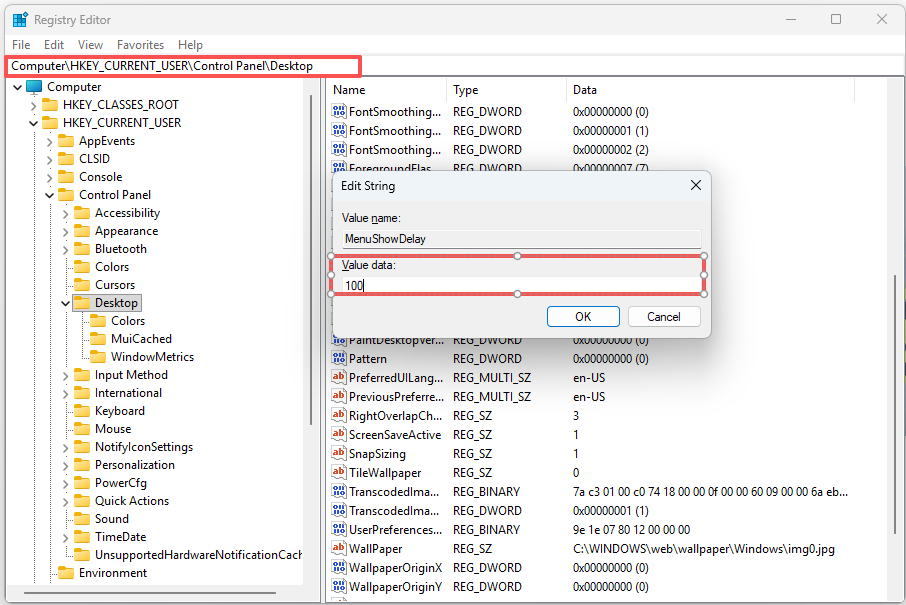
Step 2: Navigate to the following path from the left panel.
HKEY_CURRENT_USER\Control Panel\Desktop
Step 3: Find the MenuShowDelay value in the right pane, double-click it, and change its value from the default 400 to a lower number, such as 100. A lower value reduces the delay before menus appear. You can also try 0 if you want the menu to appear with virtually no delay.
Tip: If it does not exist, right-click an empty area, select New → String Value, and name it MenuShowDelay.
Step 4: Click OK and restart Windows. Then test the right-click menu again. If the delay was mainly caused by the menu display setting, it should now appear more quickly.
Method 3. Restore the Classic Windows 10 Context Menu
If you want to speed up the Windows right-click context menu without clicking Show more options, you can make the classic context menu appear by default.
Tip: This method changes the Windows Registry, so create a backup or restore point before proceeding.
Step 1: Right-click the Start button and select Terminal (Admin).
Step 2: Copy and run the following command. This creates the required InprocServer32 entry for the current user and sets its default value to an empty string.
reg.exe add “HKCU\Software\Classes\CLSID\{86ca1aa0-34aa-4e8b-a509-50c905bae2a2}\InprocServer32” /f /ve
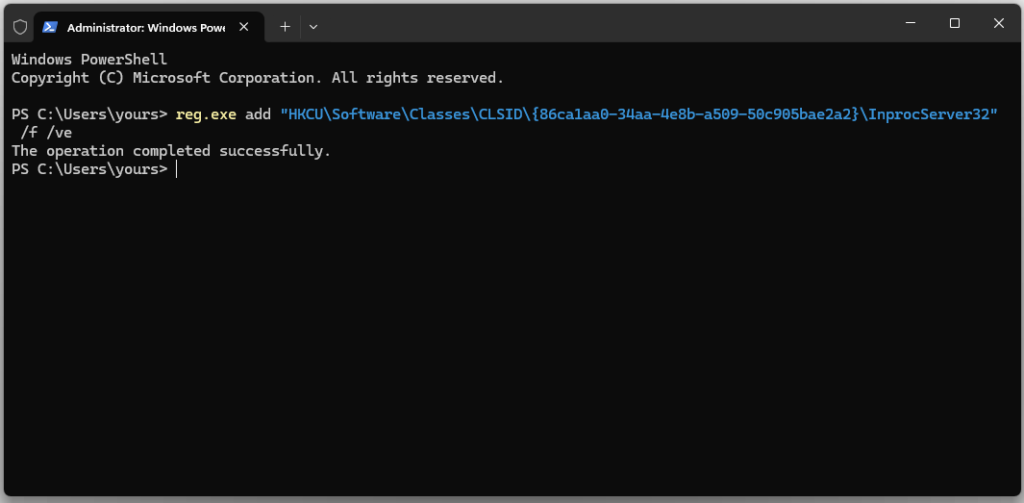
Step 3: Restart Windows Explorer or restart your PC. After Explorer restarts, right-clicking a file or folder should open the classic Windows 10-style context menu directly instead of the compact Windows 11 menu.
If you want to undo this change later, open Terminal and run:
reg.exe delete “HKCU\Software\Classes\CLSID\{86ca1aa0-34aa-4e8b-a509-50c905bae2a2}” /f
Method 4. Disable or Remove Unnecessary Context Menu Items
Some users from the Windows community have reported that a specific third-party option, such as an AMD entry, was responsible for making the right-click menu slow. This can happen when an application adds a context-menu extension that takes too long to load.
To disable these unnecessary context menu items, you can use ShellExView. It is a free Windows utility that allows you to view and manage installed shell extensions:
Step 1: Download and open ShellExView from NirSoft.
Step 2: In ShellExView, navigate to Options > Filter by Extension Type > Context Menu.
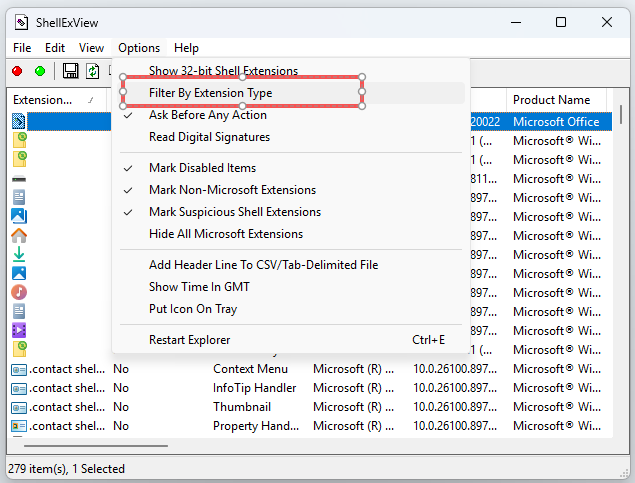
Step 3: Look for non-Microsoft extensions, especially those associated with recently installed or updated software.
Pay particular attention to entries from:
- GPU utilities
- 7-Zip or WinRAR
- Cloud storage applications
- Antivirus and security software
- File management utilities
- Other programs that add options to the right-click menu
Step 4: Highlight a suspicious extension and press F7 to disable it.
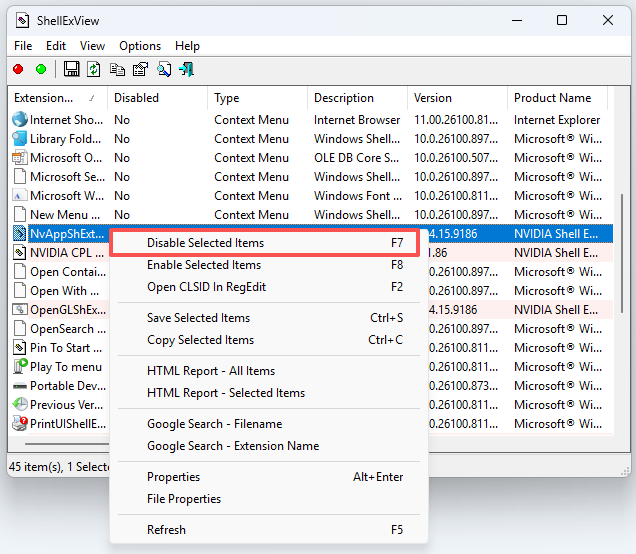
Tip: It’s best to disable extensions one at a time rather than disabling everything at once. This makes it easier to identify the specific application responsible for the delay.
Method 5. Check Recently Installed Software or Updates
If the right-click menu suddenly became slow after installing some apps or updating Windows 11, the newly added software may be the cause. To fix that, you can try uninstalling the latest update or apps.
Step 1: Press Win + I to open Windows Settings.
Step 2: Go to Apps > Installed apps.
Step 3: Find the app you recently installed or updated.
Step 4: Click the three-dot icon next to the app and select Uninstall.
Step 5: Follow the on-screen instructions to complete the uninstallation.
If the problem started after a Windows 11 update, you could also try removing the most recent update.
Step 1: Press Win + I to open Settings.
Step 2: Go to Windows Update > Update history.
Step 3: Scroll down and select Uninstall updates.
Step 4: Find the most recently installed update and click Uninstall next to it.
Step 5: Follow the instructions and restart your PC when prompted.