Formatting a USB drive to FAT32 is often necessary when preparing bootable media, updating BIOS firmware, or using a USB with a game console, car stereo, or other device. This guide from Your System Fixer explains six ways to format a USB drive to FAT32 on Windows 11, including solutions for USB drives larger than 32 GB.
Key takeaways:
- FAT32 offers broad compatibility with computers, game consoles, car stereos, and other devices.
- FAT32 supports individual files up to 4 GB, making it unsuitable for some large files.
- File Explorer, Disk Management, DiskPart, Command Prompt, and Settings provide different ways to format a USB drive.
- Windows’ built-in formatting interfaces generally limit FAT32 formatting to partitions of 32 GB or less.
- A third-party partition tool can help format a larger USB drive as FAT32 when Windows does not offer the option.
What Is FAT32
FAT32 (File Allocation Table 32) is a file system commonly used on USB drives and memory cards. It works with many devices, including game consoles, car stereos, and older computers. However, it has a 4 GB limit for individual files, so it’s worth understanding its limitations before formatting a USB drive.
FAT32 File System Limitations and Main Use Cases
FAT32 is widely supported, but it has limitations worth checking before formatting a USB drive. A single file stored on FAT32 cannot exceed 4 GB. So, you’ll find Windows’ built-in formatting tools like Disk Management and DiskPart limit the creation of FAT32 partitions to 32 GB.
Common uses of FAT32
- USB flash drives: Share files between computers and devices that require FAT32.
- Game consoles: Prepare USB storage for consoles or gaming devices that specify FAT32 compatibility.
- Car stereos: Use USB drives for music playback when the car system requires FAT32.
- BIOS and firmware updates: Prepare a USB drive for motherboard firmware files when the manufacturer’s instructions require FAT32.
- Bootable USB drives: Create compatible boot media for supported operating systems and UEFI systems.
- Older electronics: Use USB storage with TVs, media players, cameras, and other devices that may not support newer file systems.
- Small-file storage: Store documents, music, and other files that remain below the 4 GB single-file limit.
FAT32 vs. NTFS vs. exFAT
| Feature | FAT32 | NTFS | exFAT |
| Compatibility | Very broad, including older devices | Best suited to Windows environments | Broad support on modern devices |
| Maximum single file size | 4 GB | Much larger | Much larger |
| Windows formatting limit | Generally 32 GB per partition in built-in formatting tools | No equivalent 32 GB FAT32 restriction | No equivalent 32 GB FAT32 restriction |
| Best use | Older devices, boot media, cross-device compatibility | Windows system drives and Windows-focused storage | Large files and external storage |
| Journaling | No | Yes | No |
| Good for large videos | No, if a file exceeds 4 GB | Yes | Yes |
How to Format a USB Flash Drive to FAT32 on Windows 11
Formatting erases the data on the selected partition. Back up important files first and make sure you have selected the correct USB drive. Then you can choose the methods below according to your needs.
Method 1. Format USB to FAT32 via File Explorer
File Explorer is the quickest option when your USB drive has a working partition and a drive letter.
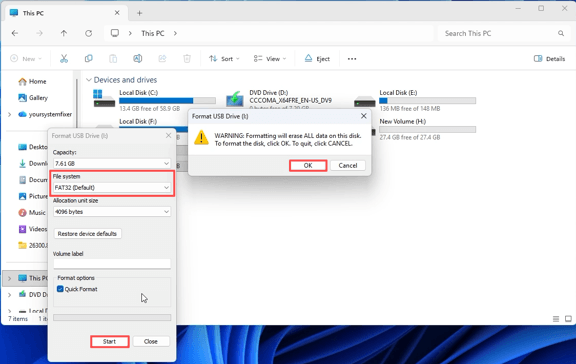
Step 1. Connect the USB drive, open File Explorer, and select This PC.
Step 2. Right-click the USB drive and select Format.
Step 3. Open the File system menu and select FAT32.
Step 4. Leave the allocation unit size at its default setting. Select Quick Format if appropriate, then click Start.
Step 5. Confirm the warning to begin formatting.
Method 2. Format USB to FAT32 in Disk Management
Disk Management provides more control over partitions. It is useful when a USB drive has no drive letter, appears as unallocated, or has a RAW file system.
Step 1. Press Windows + X and select Disk Management.
Step 2. If the USB has an existing partition, right-click it and select Format.
Tip: If it appears unallocated, right-click the unallocated space and choose New Simple Volume.
Step 3. Follow the wizard, assign a drive letter if needed, and select FAT32.
Step 4. Click OK and confirm the formatting process.
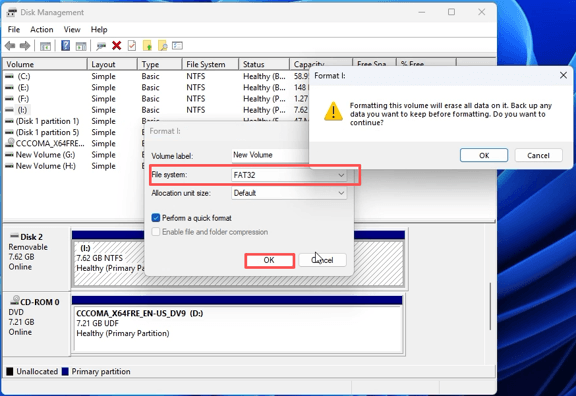
If the USB is RAW, formatting may restore a usable file system, but it will not recover files previously stored on the drive. If the FAT32 option is unavailable because the partition is larger than 32 GB, continue to Method 3.
Method 3. Format a USB Drive Larger Than 32 GB to FAT32
Windows’ built-in formatting interfaces generally do not offer FAT32 for partitions larger than 32 GB. If you need to format an entire 64 GB, 128 GB, or larger USB drive as FAT32, a third-party partition tool can provide an alternative. AOMEI Partition Assistant can help you format a larger USB drive to FAT32 through its simple interface.
Step 1. Download and open AOMEI Partition Assistant from its official website.
Step 2. Connect the USB drive and locate its partition in the program.
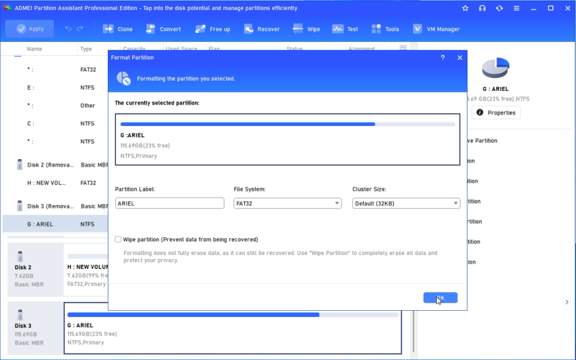
Step 3. Right-click the USB partition and select Format Partition.
Step 4. Choose FAT32 as the file system and click OK.
Step 5. Click Apply > Proceed to review and confirm the pending operation.
Method 4. Format USB to FAT32 via DiskPart
DiskPart is a command-line utility for managing disks and partitions. It is useful when you need to work directly with a USB partition, but it requires extra care because selecting the wrong disk can cause data loss.
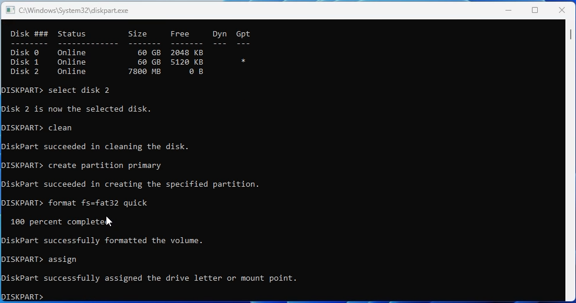
Step 1. Type diskpart in the search box, right-click the tool, and select Run as administrator.
Step 2. In the pop-up window, input the following commands in order and hit Enter after each one.
- list disk
- select disk x (x represents the USB drive number)
- clean
- create partition primary
- format fs=fat32 quick
- assign
Method 5. Format USB to FAT32 via Command Prompt
Command Prompt offers another way to format a USB drive without opening a graphical interface. It is suitable when the USB already has a drive letter, and you prefer using a direct command.
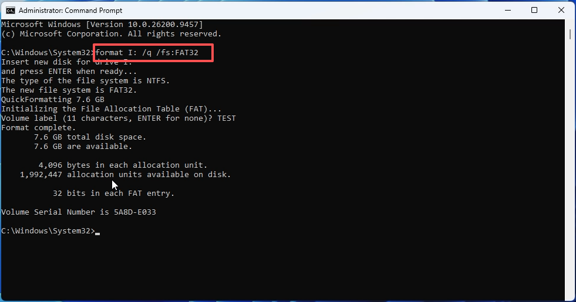
Step 1. Search for Command Prompt, right-click it, and select Run as administrator.
Step 2. Enter the following command, replacing I: with your USB drive letter:
format I: /q /fs:FAT32
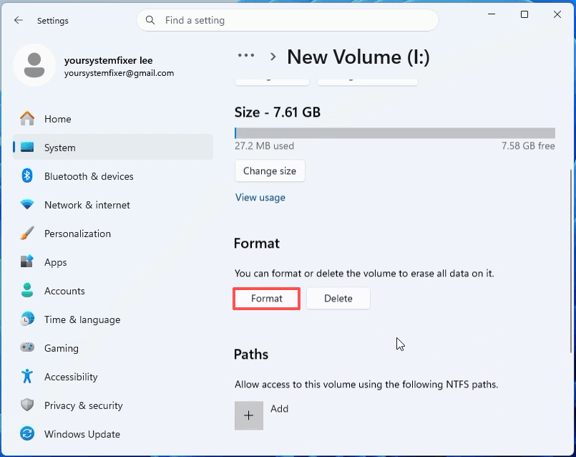
Method 6. Format USB to FAT32 via Settings
Windows Settings provides a simple route to storage management, although its formatting options can vary by Windows 11 version and device configuration.
Step 1. Connect the USB drive and press Windows + I to open Settings.
Step 2. Go to System > Storage > Advanced storage settings > Disks & volumes.
Step 3. Locate your USB drive and expand its properties or volume details.
Step 4. If the available options include Format, select it and check whether FAT32 is offered.
Step 5. Choose FAT32 if available, review the selected drive carefully, and confirm the operation.
How to Fix FAT32 Format Option Not Available on Windows 11
The missing FAT32 option is usually related to the size of the partition rather than a problem with FAT32 itself. Windows’ built-in formatting tools commonly restrict FAT32 partition creation to 32 GB. Microsoft documents this limitation for FAT32 media, while also noting that larger USB drives can be used when the FAT32 partition is limited to 32 GB or when other methods are used.
For example, if you connect a 64 GB or 128 GB USB drive and Windows only offers exFAT and NTFS, this does not necessarily mean the USB is defective.
You can try the following:
- Check the USB size and current partition layout. Make sure Windows is detecting the correct capacity and partition.
- Try Disk Management or DiskPart. These tools can help when the issue is related to the partition or drive letter.
- Use a third-party partition tool for larger FAT32 partitions. This is useful when you specifically need the entire 64 GB, 128 GB, or larger USB drive formatted as FAT32.
FAQs
How to format a USB drive larger than 32GB to FAT32?
Windows’ built-in formatting interfaces generally limit FAT32 partition creation to 32 GB. To format a larger USB partition as FAT32, use a third-party partition tool that supports the required size. Remember that FAT32 still has a 4 GB maximum single-file size.
Can Windows 11 format a 64GB USB drive to FAT32?
Yes, but Windows 11’s standard formatting interface generally limits FAT32 partition creation to 32 GB. To use the full 64 GB drive as FAT32, you typically need a third-party partition tool. Alternatively, you can create a 32 GB FAT32 partition and use the remaining space separately.
Can I format a 128GB USB drive to FAT32?
Yes. A 128 GB USB drive can be formatted as FAT32 using a suitable partitioning tool. Windows’ built-in tools generally restrict FAT32 formatting to 32 GB, so a third-party utility may be required to format a larger FAT32 partition.
What is the maximum size of a FAT32 partition?
Windows’ built-in formatting tools generally limit FAT32 partition creation to 32 GB. This is a Windows tooling restriction, not a universal limit on the size of every FAT32 partition. FAT32 also has a maximum single-file size of 4 GB.
Is FAT32 Better Than exFAT for a USB Drive?
It depends on the device. FAT32 is a better fit when a device specifically requires FAT32 or has limited file-system support. exFAT is generally more convenient for modern USB storage because it supports files larger than 4 GB while maintaining broad compatibility. If you need to store large videos, disk images, or other files over 4 GB, FAT32 is usually not suitable.